Wednesday, November 13, 2024

Dr Pepper Brownies

🍫 Dr. Pepper Brownies 🍫
These Dr. Pepper Brownies are rich, fudgy, and have a unique twist with the addition of Dr. Pepper soda. Perfect for any chocolate lover looking for something a little different!

Ingredients:
1 cup unsalted butter
2 cups granulated sugar
4 large eggs
1 teaspoon vanilla extract
1 cup Dr. Pepper soda
1 cup all-purpose flour
3/4 cup unsweetened cocoa powder
1/2 teaspoon baking powder
1/4 teaspoon salt
For the Dr. Pepper Glaze:

1/4 cup Dr. Pepper soda
1/4 cup unsalted butter
2 tablespoons unsweetened cocoa powder
2 cups powdered sugar
1/2 teaspoon vanilla extract
Instructions:
Preheat the Oven:

Preheat your oven to 350°F (175°C). Grease a 9x13-inch baking pan or line it with parchment paper.
Prepare the Brownie Batter:

In a medium saucepan, melt the butter over medium heat. Remove from heat and stir in the granulated sugar until well combined.
In a large mixing bowl, whisk together the eggs and vanilla extract. Gradually add the butter and sugar mixture, whisking constantly until smooth.

Saturday, November 9, 2024

Cheesesteak Dip

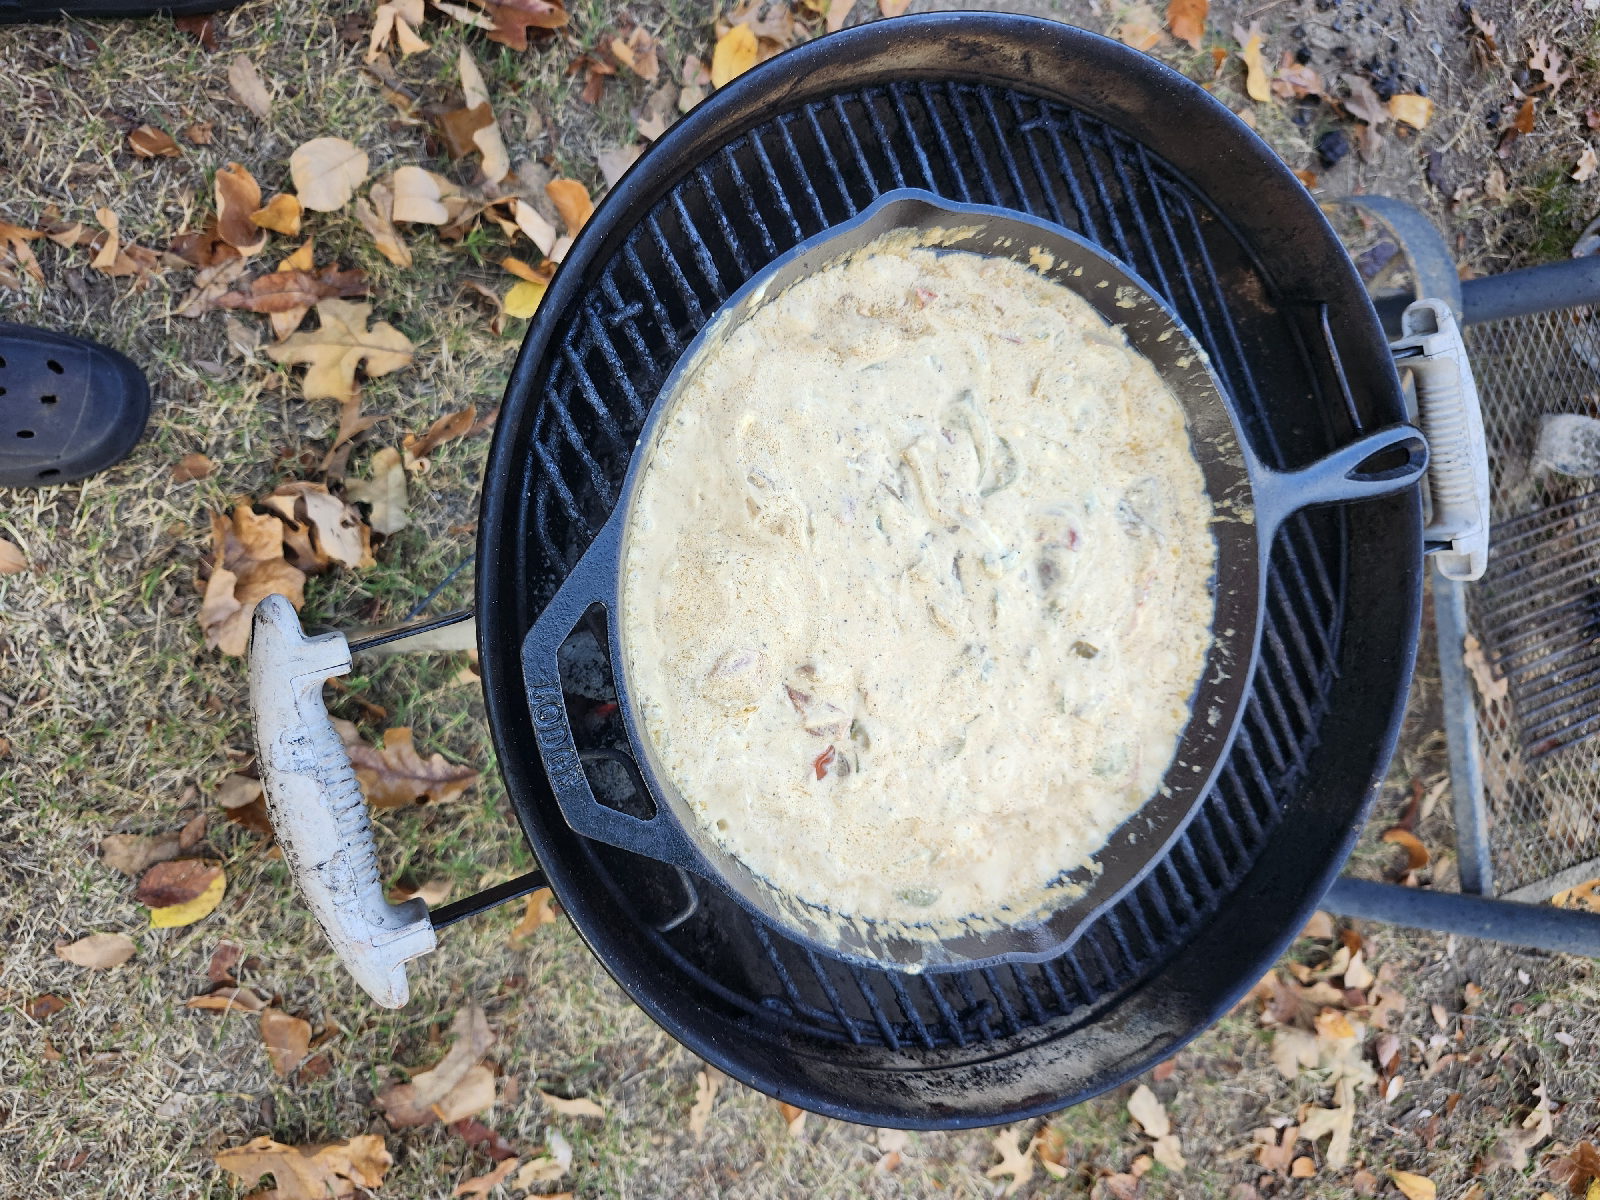
In what looks to be the next-to-last recipe of the Tailgating For Everyone experience, the friendly pitmaster endeavors to make a cheesesteak dip for the ages. I know this isn't a true Philly experience - and PA folks can keep their anger out of the comments section, so let's get down on making the party a memorable place to be. We remember those house parties back in our younger years, so why not feed the flock in the meantime in our more experienced season although it may require Icy-Hot the next morning?
INGREDIENTS 
Steak, cubed or shaved
Kosmo's Cow Cover rub
(2) 8 oz blocks of cream cheese
8 oz of sour cream 
1 green bell pepper
1 onion
1 tsp of minced garlic
Heath Riles's Garlic Jalapeño rub
4 oz each of cubed mozzarella and Monterey jack cheeses

STEP ONE. Cube your steak and cheeses as well as prepare all of the other ingredients above. You're going to want to be ready as this cook goes fairly quickly, and a trip to the store may result in your dip being burned - and no one deserves burnt cheese dip. Regarding the steak, I've seen the inspiration behind this cook (Jonathan Jones of Jonathan BBQ in Phoenix) cube up a ribeye, and since I'm not sacrificing a steak that can be thoroughly enjoyed, I snagged a cheap griller from my local grocery store. Size does matter: Make sure your steaks shaved or cubed are small enough for a quick one bite that can handle being on a tortilla chip if crostinis are unavailable in your area or the time to slice garlic breadsticks on a bias is super limited. Don't forget to add Cow Cover to the steaks on all sides although in the grand scheme of things, it will not matter; beginning cooks need to recognize that all sides and angles are worthy of flavor.
STEP TWO. One you finish the first step, head outside to light the grill. Your cooker does not matter, but for today's barbecue exercise, I have my trusty Weber kettle and some briquettes I recently bought from Costco that burn hotter and faster than the regular blue bag stuff we typically pick up from the big box stores. Bring out a cast-iron skillet and allow it to warn up to 400 degrees before adding the steak.
STEP THREE  Cook that steak to medium-well before swapping it out for the veggies, garlic, and butter. Allow the butter and Garlic Jalapeño rub to melt and garlic to get to know the peppers and onion on an intimate level until they are sautéed. 
STEP FOUR. Here come the cheeses and creams: In addition to the sautéed team still cooking on the skillet, both blocks of cream cheese, the sour cream, and cubed cheeses accept their party invitations. Let everything melt away and lastly, return the steak chucked or shaved back to the mixture for that final element of flavor punch.
Serve as soon as it is cheesy to your liking and it is pulled from the kettle.

My thoughts: OK, I like.

Do I love it? 

Unless it is specifically requested, I probably won't make it again; instead, I might redirect friends and events I cook for toward spinach dip or regular queso. It's still tasty, yet it teetered on the hit or miss line for me.
With one more week remaining in the Tailgating For Everyone experience, the final one is going to be a doozy that my fellow big backs might find themselves beating down the door for a bite. Thank you for reading and heading outside to improvise and improve a party item that otherwise would have been missed. If you like this one (or any of the other four T4E seasons' of barbecue), the methods have been lain out for mass consumption. Y'all be safe, be blessed, be good to each other, and tell everyone that every day is a GREAT day for Dub Shack BBQ!


Saturday, November 2, 2024

The Best Bite-Through Chicken You'll Eat

When I say this is the best bite-through chicken you're going to eat this this season, trust me on this one. I did a batch for work about two months ago, and when I throw these hands up and flail around in that hallelujah 🙌🏿 motion, just know that the friendly pitmaster did not come to play.

Here's how we got there.

Thanks to Kosmo for making competition chicken easier to produce and win with on a consistent basis, and enshrining backyard cooks as neighborhood legends everywhere. 
INGREDIENTS 
Chicken drumsticks
Fire Dancer BBQ's Chicken Rub
Distilled water
Big Poppa's Desert Gold rub
Butter
Dub Shack BBQ’s The O.G sauce (optional)

STEP ONE. Chicken drumsticks are generally cheap and something we all can get behind at the tailgate: You've got a leg dripping with barbecue sauce, and a bone in one hand to balance with the beverage in the other. Open the package and put all of the legs into a zip loc bag. Add Chicken Rub and distilled water to the bag, shake the mixture around, and set in a pan for two to four hours just in case the bag's contents decide they've had enough and leak out.
STEP TWO. After those three hours, remove the chicken from the bag and position in the bottom of the same pan adding Desert Gold to the bird. Slice that stick of butter into eight tablespoons and nestle them at different points of the chicken to where an even cook is ensured. Don't forget to cover the top of that aluminum pan. For those who struggle with bite-through skin, this is the tip. Place the covered pan onto your smoker at 275 and let it work for the first hour.
STEP THREE. Check the chicken using your thermometer after the first hour. If it is at or around 175, you may uncover the pan and let it play in the butter and rub mixture for another hour before pulling off the smoker. The problem I have had is a minor one where the meat falls off the bone: Yes, it means I overcooked the chicken. In most instances, it was only one or two drumsticks from the original package, and the others were fine.
STEP FOUR. This is completely optional, but you can either dunk the chicken or simply use a brush to drizzle the sauce and return to the smoker to tack up. Afterwards, return to the serving block to rest and for the juices to redistribute throughout each piece before serving. Enjoy!
My thoughts: I did this as a trial run for my crew two months ago, and they absolutely LOVED them! Because I don't do competition barbecue (y'know, something to do with registration fees, the price to participate not only limited to the meat itself but also set up and the most myriad list of supplies, and having to submit PTO to compete among the best around here since most tournaments happen to fall on my scheduled weekends in the plant),  I figured I had better hone my skills before I try to put the smoke in the air for the general public to enjoy. Shout out to those guys who were my taste testers that week, and to my family for consuming this version.

For the low, low price of $2.74, I'd dare say this is some tasty chicken. 

Anyway, get out there and cook something awesome this weekend or whenever the opportunity to make superb barbecue presents itself. As the Reddies' football season draws to a close and likewise with the Tailgating For Everyone series in a few short weeks, this is the reminder that great food doesn't have to break the bank. Y'all be safe, be blessed, be good to each other, and tell everyone that every day is a GREAT day for Dub Shack BBQ!

Saturday, October 26, 2024

Easy Fixins': Dub Shack BBQ Presents Honey Hot Chicken

The heat can be turned up or down to your preference. This may/may not be that booty burner that can keep you on the toilet or in tears. Since the heat I like isn't one to hurt feelings or have Billy Badass crying to his mommy, you can take the title with a grain of salt yet the honey part remains. 

To let y'all in on something about me, I mainly live on grilled chicken sandwiches when we drive to the beach on vacation week until we get to where we are sleeping. Therefore, Bojangles, Krystal, and yes, Chick-fil-A tend to find a way to separate money from your friendly pitmaster. 

INGREDIENTS 
Whole chicken
Fire and Smoke Society's Hot Honey Buzz rub
Dub Shack BBQ’s Get Hot Honey barbecue sauce*
Hamburger slider buns 
Provolone cheese 
STEP ONE. We spatchcock the birds. If you've never done it, simply cut the backbone out of the whole chicken and flatten it for even doneness. Use a liberal dosage of Hot Honey Buzz on both sides of the birds and set aside as the smoker works its way up to temperature. 
STEP TWO. In the miracle of time, the chickens (I did two) are ready for mesquite smoke! 

STEP THREE. Remember, your food cooks how it lays on the grill. Since Senior (my OG Oklahoma Joe offset smoker) got the assignment, allow it to rise to 250-275 degrees before laying both birds out for initial smoke. You can keep the skin on for presentation purposes, and there will be a separate post of the best bite-through chicken skin later this season, so leave the birds be for their smoke nap. At one hour, probe the breast, thigh, and one of the legs for doneness to determine if they either need to be repositioned or left alone. 
STEP FOUR. After the chickens near eating temperature (165 for breasts, 175 for thighs), I tend to put them in aluminum pans and cover them up for at least half an hour before pulling to ensure a thorough cook and juicy chicken. In the bottom of the pan, feel free to add a braising liquid such as chicken broth or Miller Lite to the bottom of the pan in order to fortify the poultry flavor. Bring both chickens when both parts meet the mark and prepare for the next step.
STEP FIVE. Look at those pretty chickens. Feel free to part them out any way you want, but today and for this recipe, we pull chicken.

Let's get busy.

You can't tell me nothing about that color

What's the fun part, friendly pitmaster?

Building the sandwiches.

You have the liberty to build and serve chicken sandwiches any way you desire, but you're really here for the Get Hot Honey sauce. On the bottom part of the slider bun, start with provolone cheese and you can go to town. Me? Give me toasted buns, the pulled chicken itself, a slice of provolone cheese, Get Hot Honey sauce, and the top bun. Don't forget to butter the tops and as an over-the-top move, sprinkle Everything Bagel over the sliders and broil on high for 45 seconds. Remove and serve immediately!

Optional and likely next time around, Get Hot Honey will be in a serving cup to dip my sandwiches into.

As always, thank you for reading and sharing this post. Holiday and weekend cookouts do not have to be the extravagant affairs we sometimes let them become; periodically, a good chicken sandwich is all we need. Keep going outside and cooking great food that will not only fill you up but also provide the chance to make memories. Y'all be safe, be blessed, be good to each other, and tell everyone that every day is a GREAT day for Dub Shack BBQ! 

*Get Hot Honey is in the early testing process. If I like it enough and the core group of samplers think it passes muster, it will be not only on the roster but 2024's holiday surprise sauce from your friendly pitmaster. Pop Da Cherry and Deez Apples are riding off into the sunset - for now.

Saturday, October 19, 2024

Promises Made, Promises Kept: Dub Shack BBQ Presents Smoked Mexican Street Corn Dip

This one has been a long time coming. 

About a year ago, my neighbor tagged me in someone's street corn dip recipe and it got the wheels turning - or in Houston, the swangas rotating - as to how I can make my mark with it within our price point and time constraints. Having ingredients as a one-time use is cost-prohibitive, and as my wife has kindly encouraged me to trim down my side of the spice cabinet before seeing the local BBQ supply plug, I needed to cut down from nearly forty bottles to something more manageable. That eternal kitchen renovation project has been put on hold, yet I still need to make room for if/when it happens. Hint: I need money. Lots and lots of money. 
INGREDIENTS 
(1) 2 lb block of Velveeta Blanco
(1) 8 oz block of pepper jack cheese
30 oz of frozen corn
(2) 6 oz cans of diced green chiles
(1) jar Herdez Salsa Verde mild 
Juice of two limes
1/2 c 2% milk
Texas Round Up Fajita seasoning, aka the Buc-ees fajita rub
Big Poppa's Jallelujah Lime rub 
1/2 red onion
10 oz cotija cheese

STEP ONE. Just like most of Da Dips, this is a dump-and-go recipe. If you have the time, grill your eight ears of corn and shear them off into an aluminum half-pan; otherwise, the bag of frozen corn is your base. Dice up the Blanco queso and pepper jack cheese and add to the pan along with everything else except the cotija cheese. One common approach is to shred five ounces for a topping at the end along with crema (Mexican sour cream), but this time around, I cubed it up as well and threw it into the pan. When it comes to the seasonings, go until the ancestors tap you on the shoulder. Mix all of the ingredients together and set aside for smoke.

STEP TWO. Today, my new-to-me smoker Junior got the assignment mostly because it was cleaned from that brisket cook I did at home last week and the fact it holds high temperatures better than the O.G. one in Senior. Once it got to 275 degrees, the mixture went to melt away into something super fun to eat. Stir every ten minutes and pull when the cheeses have completely melted to the consistency of desire. Wait about fifteen minutes and serve!

That's all.
Because my neighbor Ryan put me on the clock last year as I was itching to drop desserts instead, I had to wait for the right time for him - and the rest of you - to enjoy my workaholic take of Mexican street corn dip. I've eaten it every day this week, and it shall happen again. To cut the spice and heat, you can always limit the chiles to one (or none) or find a tamer green salsa. I know this will be a dope T4E recipe that will get all of the rave reviews! 

Anyway...thank you for reading and trying out this recipe. While it isn't entirely true to Mexican street corn, its deconstructed form deserves the compliments as well. If you want to see something else from your friendly pitmaster, just let me know in the comments section and I'll shout you out when it happens. Could it be honey buns and Red Hots next? Another dip? More sliders? Each week is different - and if you're fortunate enough to come around for R&D days, you might mess around and run across a hit. [I'd love to say I don't miss, but even I know that is cap.] Y'all be safe, be blessed, be good to each other, and tell everyone that every day is a GREAT day for Dub Shack BBQ!


Saturday, October 12, 2024

Me So Hungry: Dub Shack BBQ Presents BBQ Shrimp

To maximize my precious time, I will sometimes do multiple cooks, and for those occasions, there had better be a snack that will make your guest scream the pitmaster's name. This BBQ shrimp happens to be one of those, and in ten minutes' time, they will be ready sooner than your date when you pick her up for dinner.

INGREDIENTS 
One pound of shrimp, preferably deveined
Avocado oil 
One stick of butter, sliced into tablespoons 
Minced garlic
Razorracks BBQ's All Day all-purpose rub
A few teaspoons of Worcestershire sauce
STEP ONE. If frozen, thaw the shrimp per package instructions. Otherwise, clean them up by deveining and/or peeling shrimp. Season the shrimp on all sides with All Day and set aside.
STEP TWO. Since my Weber kettle and cast-iron skillet got the assignment, light the grill up for a two-zone fire at 350 degrees. Because shrimp cooks so quickly, do not worry about adding a smoke flavor to those crustaceans; save the pecan wood for next time around. Add avocado oil to the skillet and place it directly above the coals, and then add the butter, garlic, and Worcestershire sauce to play together before the shrimp joins the party. Turn after five minutes to even doneness on both sides, and pull at 145 degrees or just before they curl into tight circles. Another way to know - and particularly with a larger size - is paying attention to the shrimp's shape: You want them to look like the letter C for no one is interested in overcooked seafood.
STEP THREE. Remove from the grill, let the skillet cool down a few minutes, and devour!
Hope you have a baguette to sop up the butter mixture. 

Like the classic smoked shrimp recipe, this won't last long. I usually keep shrimp on deck meaning that if I run out, it's just a quick trip outside to cook up another batch. As always, thank you for reading and sharing this post among friends, family, neighbors, and anyone looking to score a bite. I do appreciate the eyes and views T4E brings, and they alone are the encouragement to keep coming up with all of the awesome ways to eat barbecue. Y'all be safe, be blessed, be good to each other, and tell everyone that every day is a GREAT day for Dub Shack BBQ! 

Saturday, October 5, 2024

Where the Party At? Dub Shack BBQ Presents Party Ribs

If you began singing or dancing to Jagged Edge when you read the title, you're my kind of people. If not, peep the "Where the Party At" video featuring Nelly circa 2000 to find out where the party is - or otherwise, you're too young for this rib tasting.


INGREDIENTS 
One rack of baby back ribs, cut into individual ribs
Fire and Smoke Society's Pork Perfect rub
Dub Shack BBQ’s The O.G sauce
Brown sugar
1/2 stick of butter, sliced into tablespoons 
For this cook, my ribs were for the low because I did them the same day. Don't be scared of the yellow stickers at Walmart if you do it right

STEP ONE. Unwrap the ribs and remove them from the package along the way remembering to pat them dry. Follow the bone structure and slice between then to ensure even sizing; we don't want Don or Quan crying over having the smallest baby back rib or the one with the least amount of meat. As it is optional, you can use mustard as a binder for the rub to adhere to those party ribs. Set them aside and light the smoker. 
STEP TWO. Just like any other rib cook, light your smoker - or grill - to 250 degrees, depending on the size. Since I have a brisket working on Junior, the Wal-Mart special gets the assignment. Your wood choice may not matter in this cook; if it does, then select a wood that will not overpower pork such as apple or if you're lucky, peach. This is going to be a two-zone cook that may be even quicker than doing the whole rack. 
STEP THREE. Let these babies for an hour before peeking inside for color and temperature. The ribs should have a nice color depending on the rub and perhaps even some pullback on the bone; feel free to probe each party rib for a temperature of 165 degrees before moving them to a aluminum pan for a tender bath in butter, honey, brown sugar, sauce, and the aforementioned favorite rub to reinforce the original flavor profile. Pull after the ribs reach 210 degrees for fall-off-the-bone ribs, or 202 for bite-through ribs. Cool for fifteen minutes and serve immediately!
My thoughts: I may never smoke a whole rack of ribs in the traditional way for the family ever again. The color was there, yet the reason I went longer is to prevent that dried out taste that often comes with newer cooks - and those of us who aren't paying attention to the product - of pork chops. Per the FDA, pork chops and loins can be eaten safely at 145 degrees while ribs, Boston butts, pork shoulders, and pork belly can cook to around 202 degrees without risking trichinosis and other forms of food poisoning. 

Below is the definition of trichinosis: 
Trichinosis is a food-borne disease caused by a microscopic parasite called Trichinella. People can get this disease by eating raw or undercooked meat from animals infected with the parasite. Often these infected meats come from wild game, such as bear, or pork products. 

Just make sure your pork is fully cooked, and for those members of the Pork Patrol, I fully understand. For a biblical context beyond Leviticus 11:17, read Matthew 8:28-34 for the Demons and the Pigs parable and likely the real reason our Muslim brothers and sisters do not eat pork.

If anyone wants to know where the party is, pull up with this tasty pan of party ribs for the next event. As always, thank you for reading and sharing this post among friends and family members. In what amounted to two hours from start to finish, these are also a quick way to feed the folks. Y'all be safe, be blessed, be good to each other, and tell everyone that every day is a GREAT day for Dub Shack BBQ!